Windows 內建 SNMP 已棄用,
LibreNMS 怎麼撈?交給 jt-snmpd 接手。
Windows' built-in SNMP is deprecated.
So where does LibreNMS get its data? jt-snmpd takes over.

jt-snmpd 是一個 唯讀 的 Windows SNMP agent,以標準 MIB 把主機監控資料餵給 LibreNMS, 而且不必修改 LibreNMS。磁碟 SMART、ACPI 溫度區、硬體 inventory 全程走 SNMP, 被監控端裝的就只有 jt-snmpd 一個,不必再放 LibreNMS agent、輔助腳本或任何額外工具。 jt-snmpd is a read-only SNMP agent for Windows that serves host monitoring data over standard MIBs — and needs no changes on the LibreNMS side. Disk SMART, ACPI thermal zones and hardware inventory all travel over SNMP, so jt-snmpd is the only thing installed on the monitored host: no LibreNMS agent, no helper scripts, no extra tooling.

GPL-3.0-or-later Windows 10 / 11 / Server 2016+ SNMP v2c SNMPv3 authPrivSNMPv3 authPriv 唯讀read-only 無對外連線no outbound connections 不需核心驅動no kernel driver

為什麼要有它Why it exists

Microsoft 已將內建 SNMP Service 標記為棄用,不再積極開發,未來版本可能移除。它支援 SET、把每一個 NDIS 篩選器驅動程式都當成獨立介面輸出、 沒有速率限制,而且來源檢查發生在封包解析之後 Microsoft has deprecated the built-in SNMP Service. It supports SET, publishes every NDIS filter driver as a separate interface, has no rate limiting, and applies its source check after parsing the packet.

唯讀不是設定,是沒有那條路徑Read-only by construction

不覆寫 pysnmp 的 write_variables(),SET 請求連處理的程式碼都不存在, 直接丟棄且不回應,不提供任何可探測的訊息。 The agent never overrides pysnmp's write_variables(), so there is no code path for SET at all. Requests are dropped without a reply, offering nothing to probe.

前置解析閘門Pre-parse gate

來源 ACL、封包大小上限、每來源 token bucket、外層 TLV 檢查,全部在 BER 解碼器之前。 BER 解碼器是攻擊面最大的一塊,未授權封包碰不到它。 Source ACL, size cap, per-source token bucket and outer TLV sanity all run before the BER decoder — the largest piece of attack surface never sees an unauthorised packet.

不拖慢被監控的主機It does not slow the host down

實測在 7,000 倍真實輪詢速率下,固定基準工作負載退化 0.41%。 單次完整 walk 12.5 ms CPU;LibreNMS 每 5 分鐘一次,實際佔用約 0.004%。 Measured at 7,000× the real polling rate, a fixed benchmark workload degraded by 0.41%. One full walk costs 12.5 ms of CPU; at LibreNMS's five-minute interval that is roughly 0.004%.

量不到就不回報Never fabricates a value

採集失敗時該列從快照消失,不回 0、不回前值。SMART 屬性沒量到就是 null, 在「重新配置磁區」填 0 的意思是「這顆碟很健康」,那是謊言。 When a collector fails its rows disappear from the snapshot rather than reporting zero or a stale value. An unmeasured SMART attribute stays null: a fabricated zero in "reallocated sectors" reads as "this disk is healthy".

ifIndex 跨重新開機穩定ifIndex survives reboots

以 NET_LUID 為主鍵長期保存的配發。Windows 原生索引在換驅動、拔插網路卡後會重編號, 那會讓 LibreNMS 的歷史 RRD 全部失去對應。 Indices are assigned from the persistent NET_LUID. Windows' native numbering changes when a driver is updated or a NIC is replaced, which orphans every historical RRD in LibreNMS.

不引入核心驅動No kernel driver, ever

CPU 核心溫度需要讀 MSR,那必須有驅動;業界慣用的 WinRing0 已列入 Microsoft 易受攻擊驅動封鎖清單。 為了一個溫度值在數百台主機裝一個能任意讀寫實體記憶體的驅動,是把監控工具變成提權管道。 CPU package temperature needs MSR access, which needs a driver — and the one everyone uses (WinRing0) is on Microsoft's vulnerable-driver blocklist. Installing something that can read and write physical memory on hundreds of hosts, for one temperature reading, turns a monitoring tool into a privilege-escalation path.

與內建 SNMP Service 的實測對照Measured against the built-in service

上下兩半來自同一台機器,先後跑兩種 agent。 硬體、作業系統與監控端完全相同,唯一的變數是誰在服務 UDP 161。 Both halves of every figure come from one machine, running each agent in turn. Same hardware, same operating system, same monitoring server: the only variable is which agent is answering on UDP 161.

受測機器The machine

機型Model
Dell Latitude E5270 筆記型電腦 notebook
CPU
Intel Core i5-6300U @ 2.40 GHz,2 核, 2 cores
記憶體Memory
16 GB DDR4-2133
磁碟Disk
Samsung PM871b M.2 256 GB
作業系統OS
Windows 10 22H2 (build 19045)

怎麼取得的How it was taken

  1. 裝上 Windows 內建 SNMP 功能,設好唯讀 community,由它服務 UDP 161 Install the built-in Windows SNMP feature, give it a read-only community, and let it serve UDP 161
  2. LibreNMS 重新探索並輪詢,截下四個頁面 Rediscover and poll from LibreNMS, then capture the four pages
  3. 把 161 交還給 jt-snmpd,再探索、再輪詢、再截一次 Hand 161 back to jt-snmpd, rediscover, poll and capture again
  4. 移除內建 SNMP 功能,機器回到原本的樣子 Remove the built-in SNMP feature, leaving the machine as it was

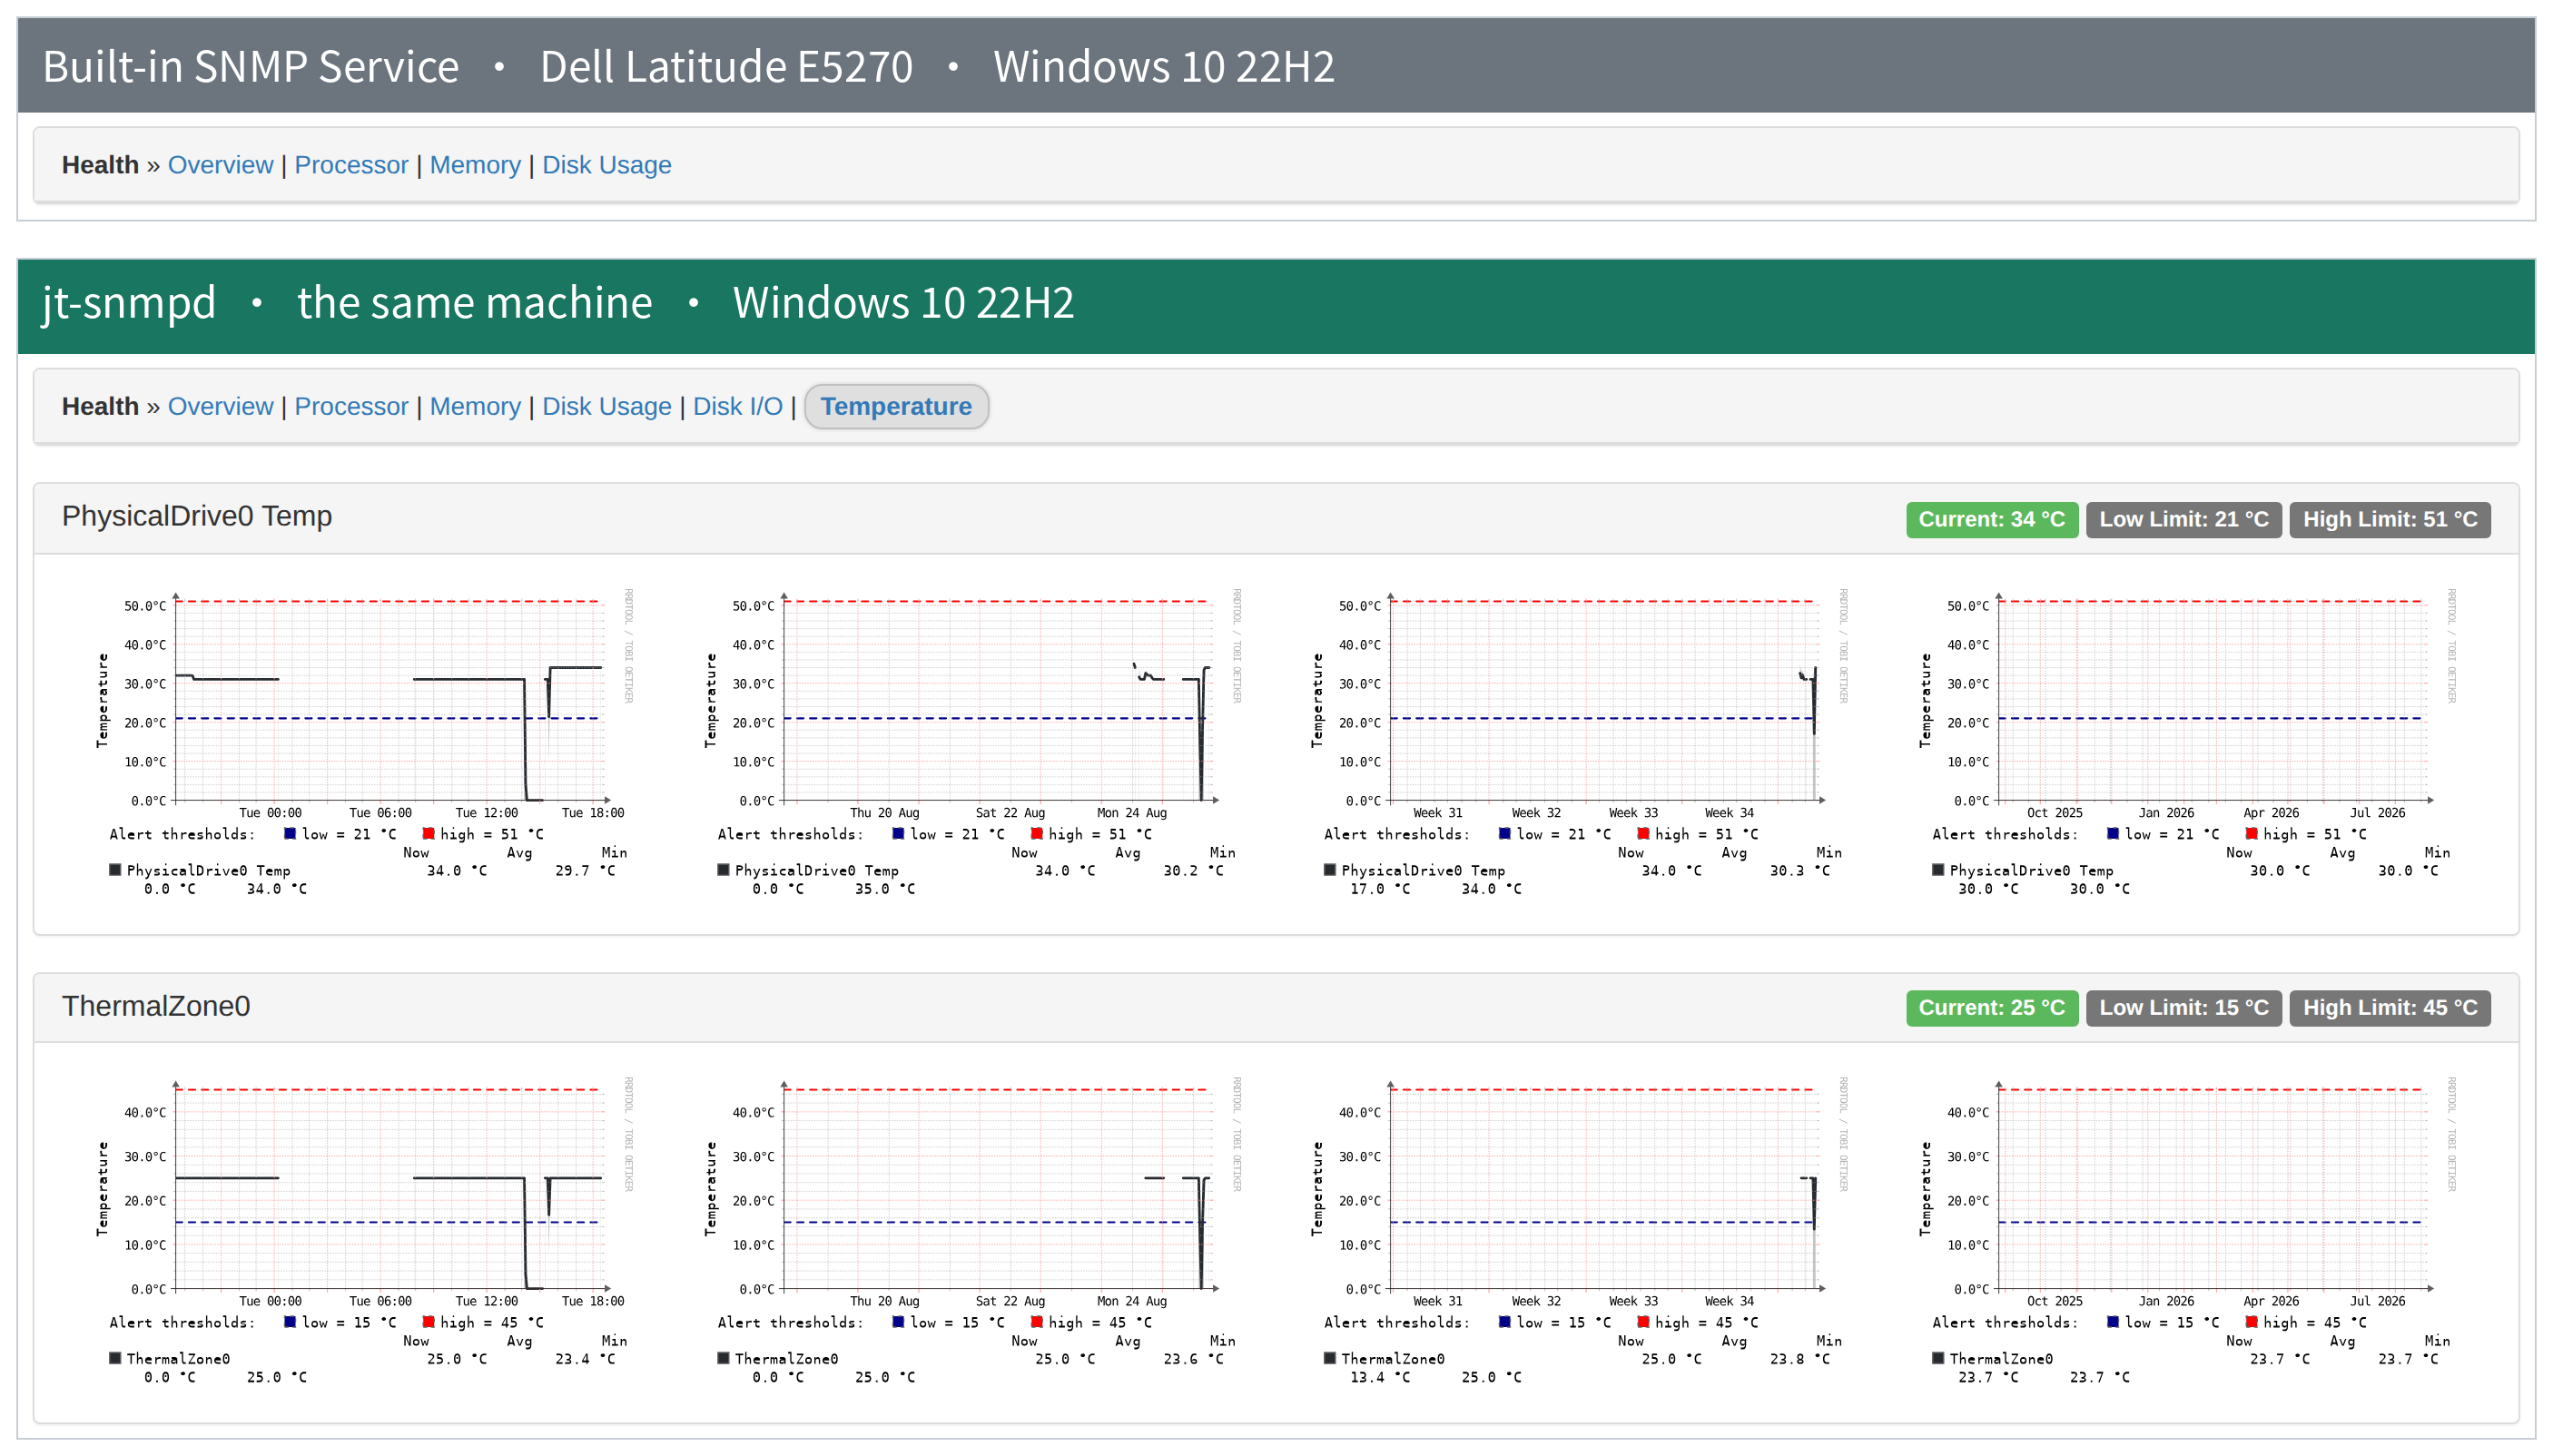
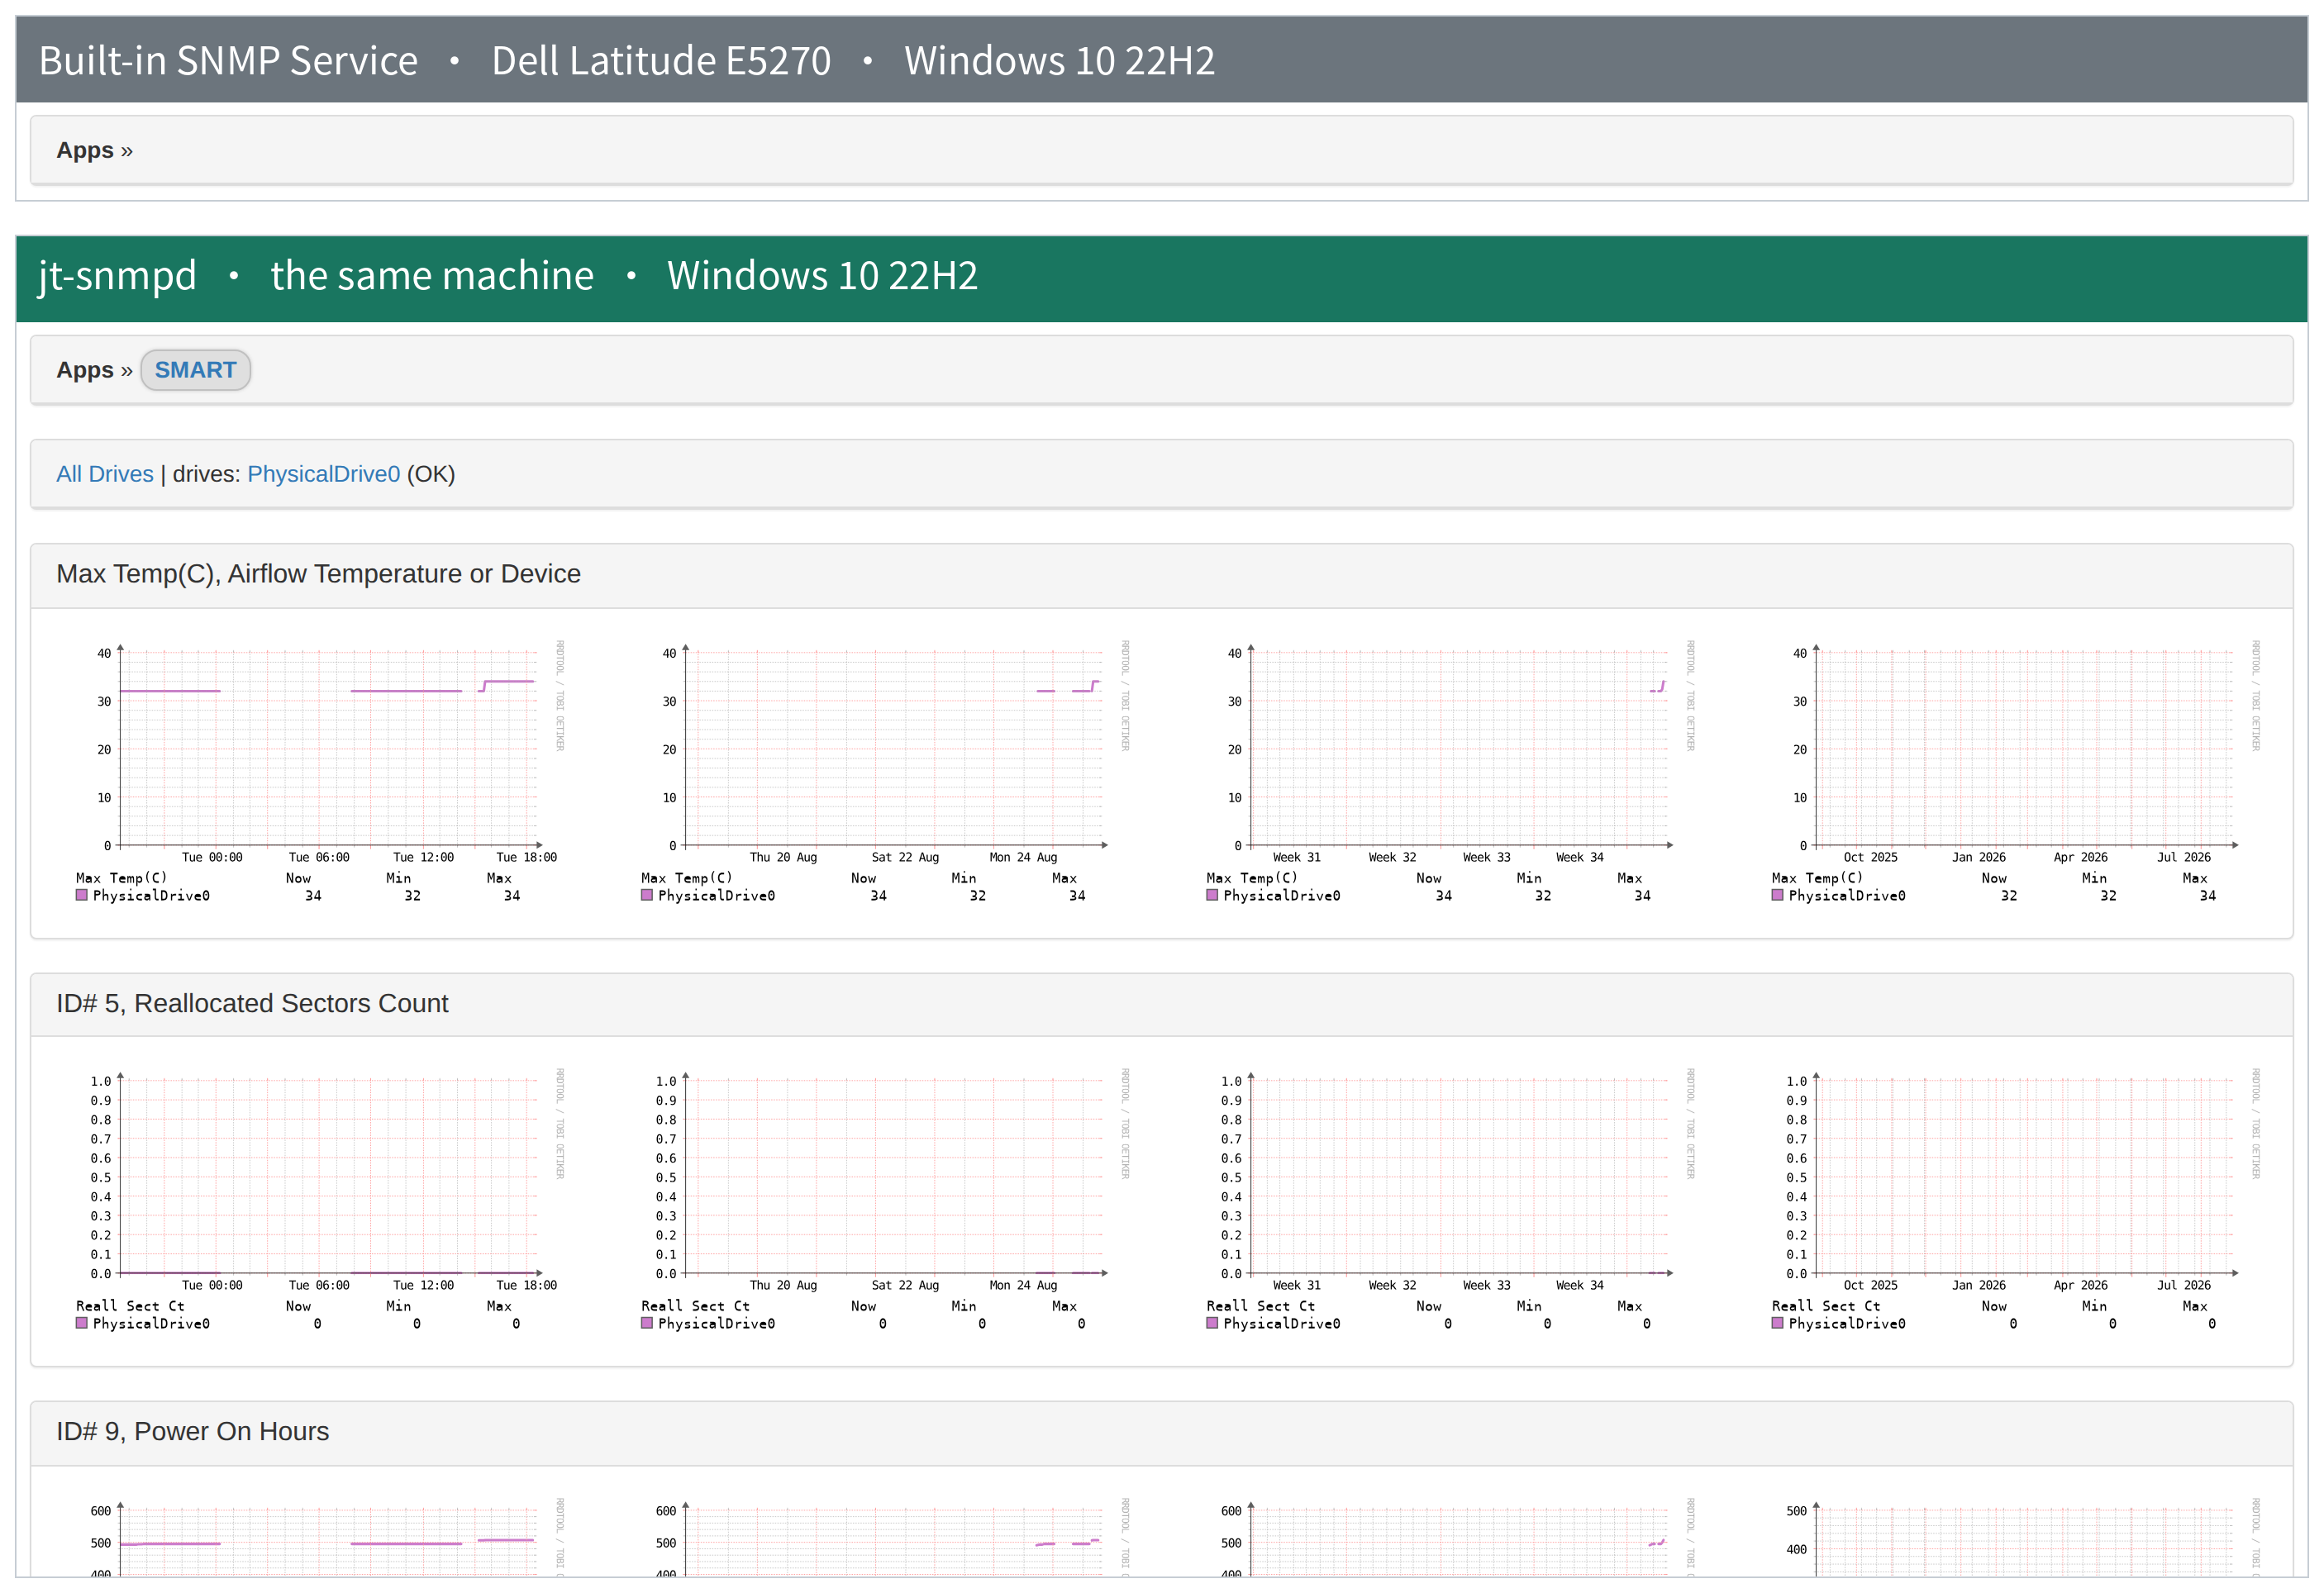
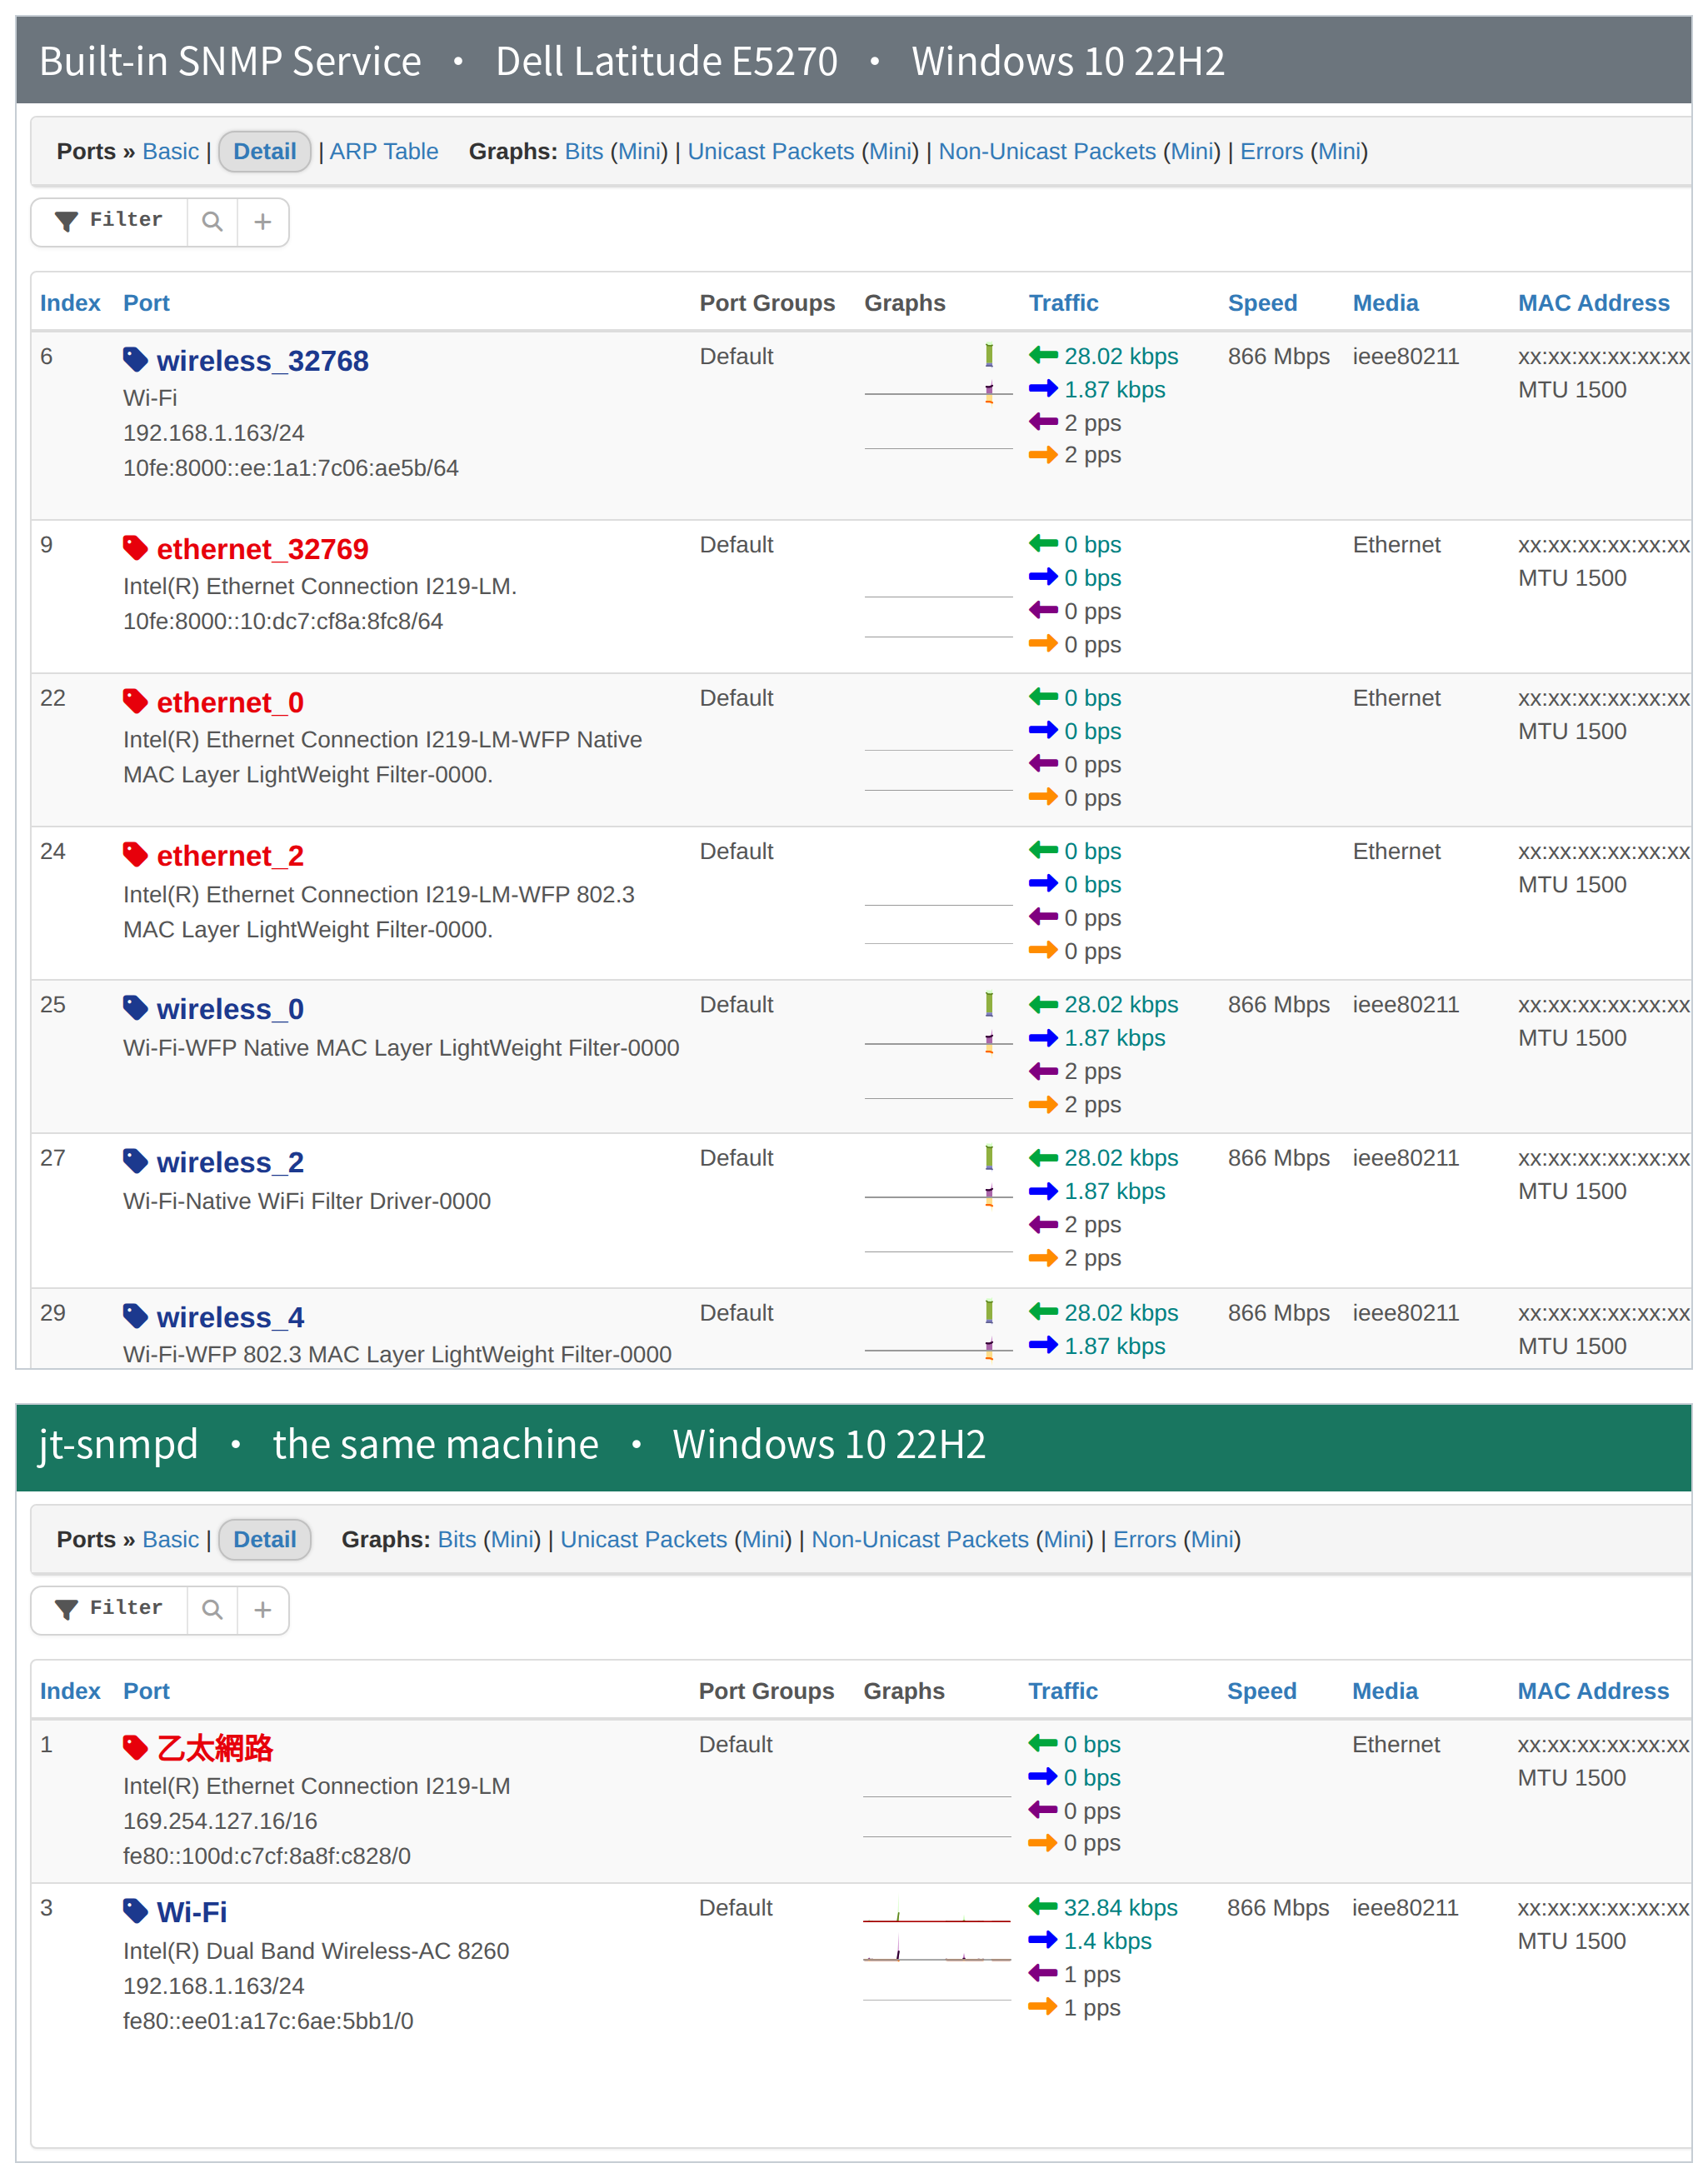
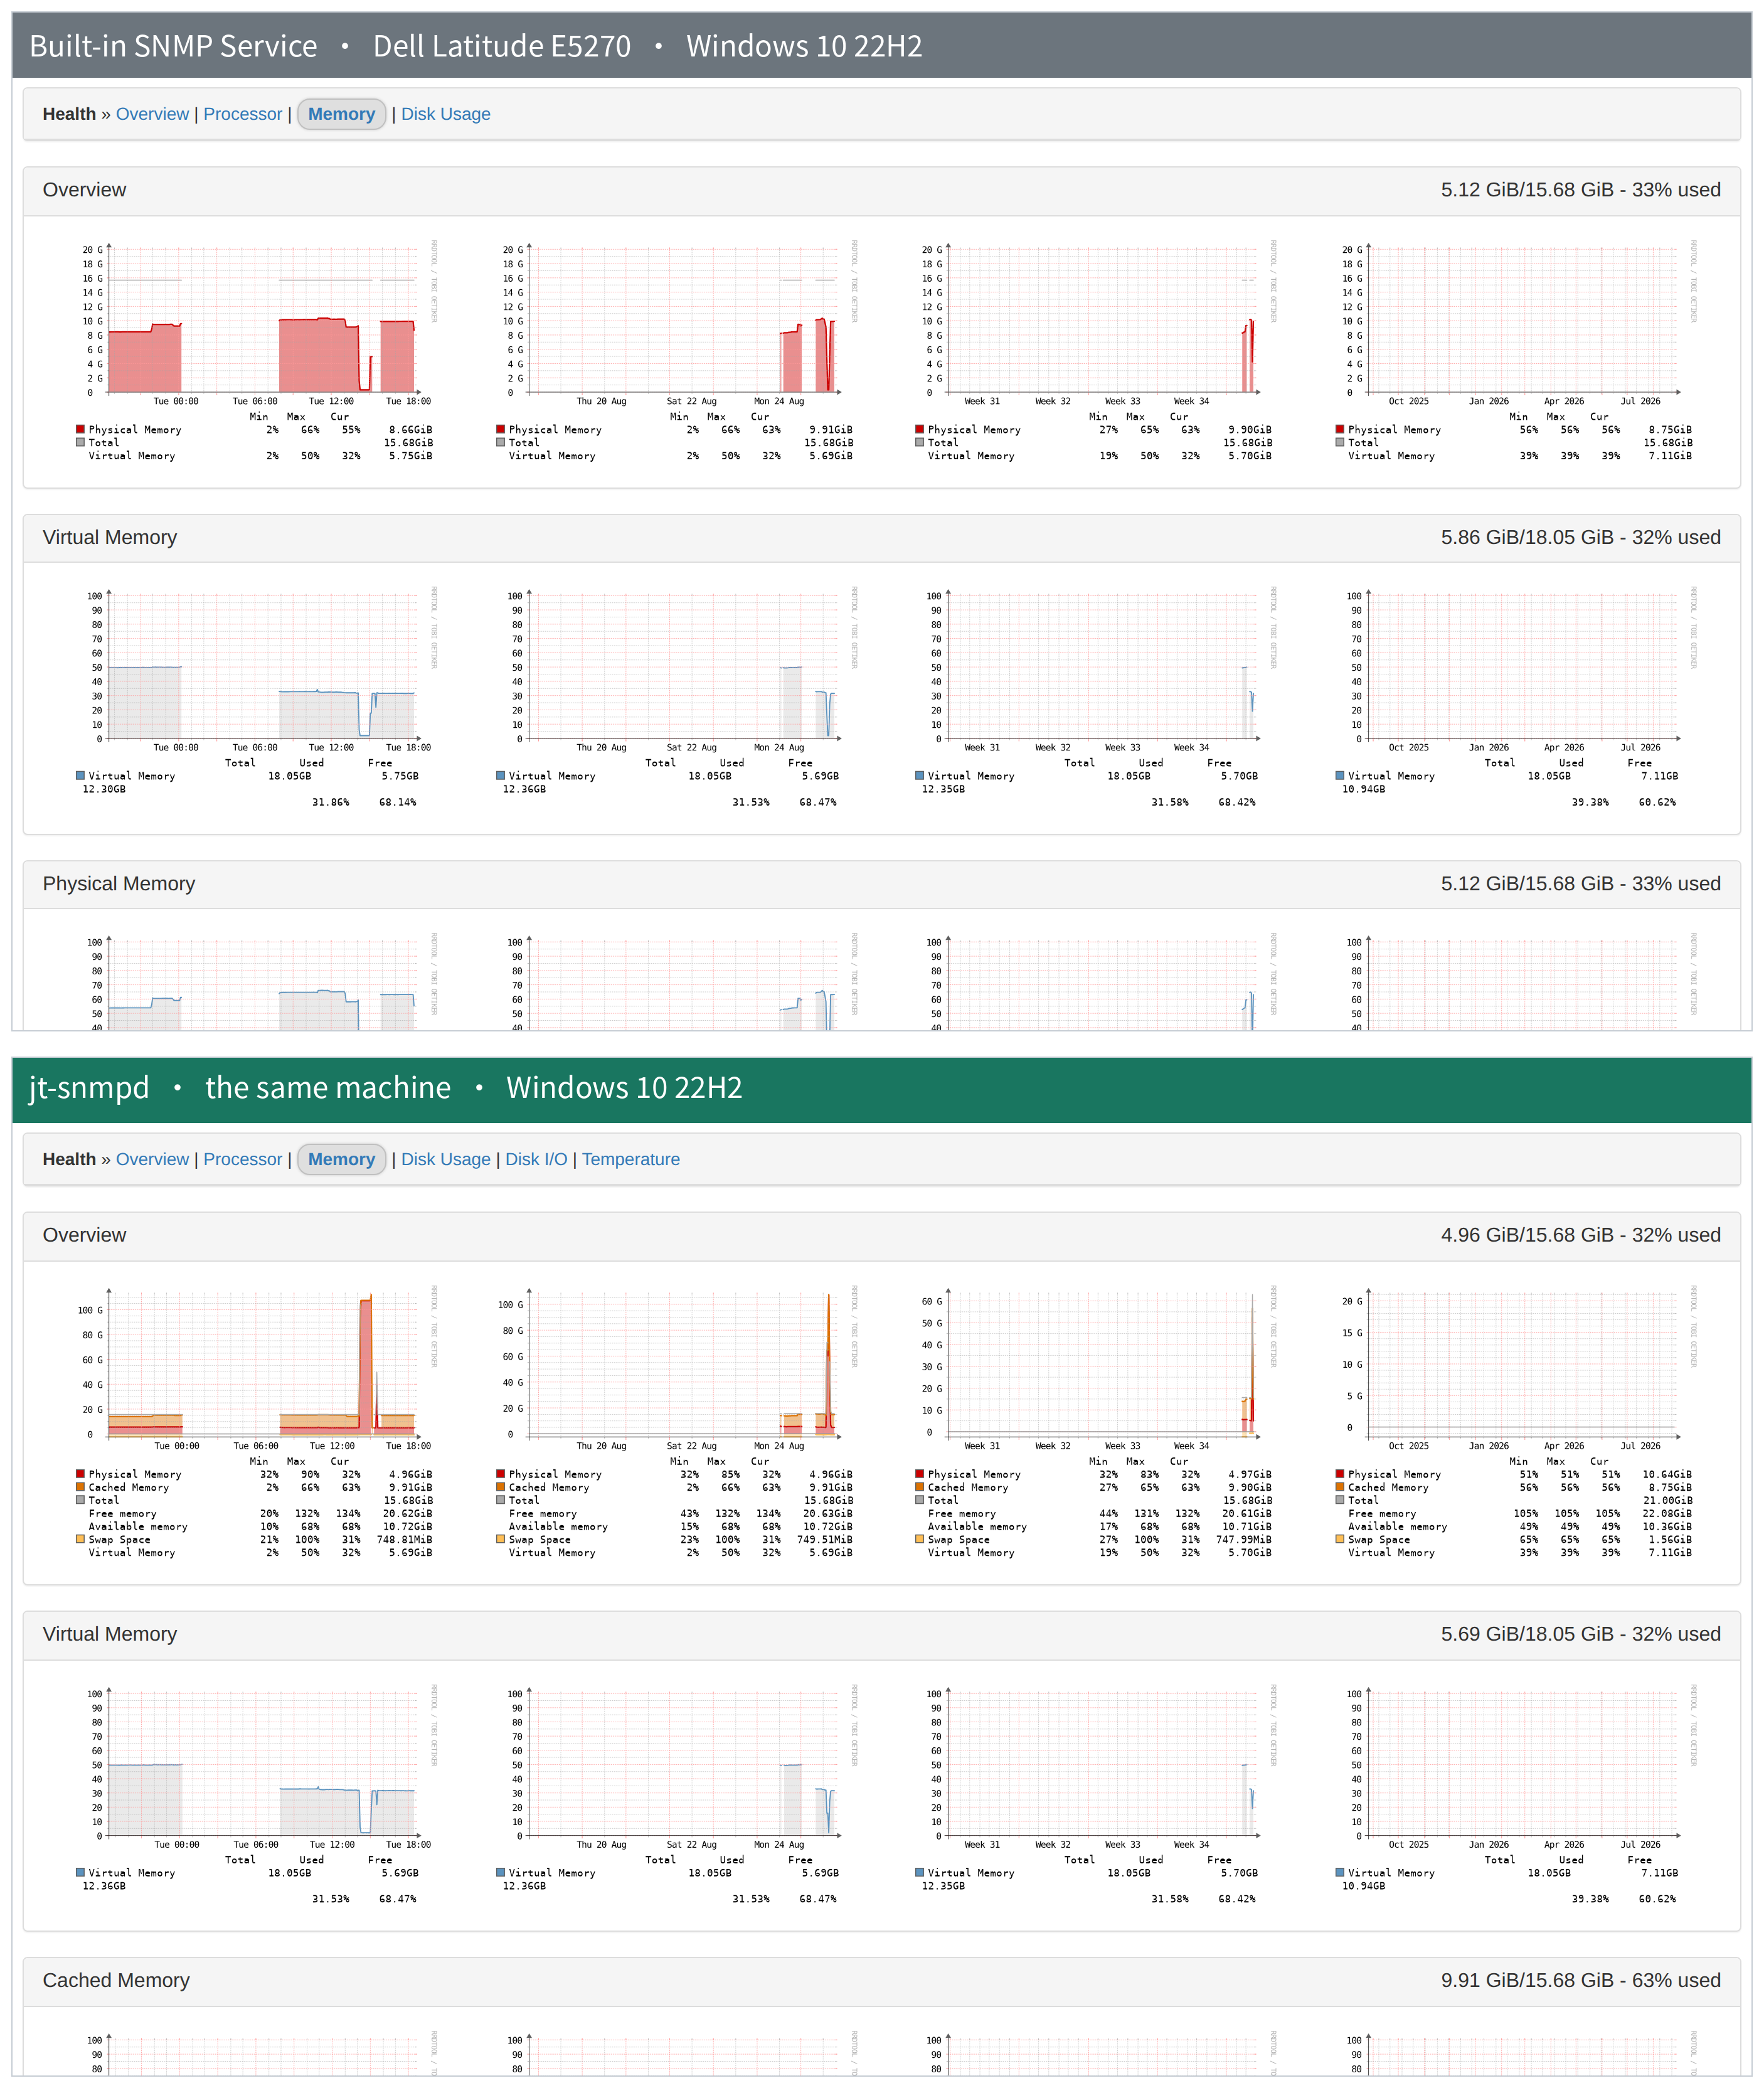
LibreNMS 端未做任何客製。MAC 位址在截圖之前就在頁面上改寫遮蔽; 連接埠那張裁掉了 MAC 欄右側的鄰居裝置清單,那是網路上其他機器的名單, 跟這張圖要說的事情無關。溫度圖上那幾次掉到 0 °C,是拍攝過程中把 161 交給另一個 agent 的那幾分鐘,感測器沒有資料可回報,不是量到的溫度。 其餘內容未經修圖。 Nothing was customised on the LibreNMS side. MAC addresses were rewritten in the page before each capture, and the ports figure is cropped at the MAC column, which drops the discovered-neighbour list: that is an inventory of other machines on the network and no part of what the figure shows. The dips to 0 °C in the temperature graphs are the minutes during capture when UDP 161 belonged to the other agent and there was nothing to report; they are not measurements. Nothing else is retouched.

LibreNMS 頁面LibreNMS page 內建 SNMPBuilt-in SNMP jt-snmpd 說明Notes
設備(entPhysical)Inventory (entPhysical)08 從 SMBIOS 解析機箱、主機板、CPU、DIMM、磁碟 Chassis, mainboard, CPU, DIMM and disks parsed from SMBIOS
應用程式 › SMARTApps › SMART06 走 NET-SNMP-EXTEND-MIB,完全 SNMP,agent 自己以 IOCTL 讀 SMART Over NET-SNMP-EXTEND-MIB — pure SNMP, the agent reads SMART itself through IOCTL
健康情況 › 感測器Health › Sensors02 磁碟溫度,以及 ACPI 溫度區(主機板韌體自己定義的量測點,通常對應 CPU 周邊或機殼),兩者都帶韌體宣告的門檻值 Disk temperature, plus ACPI thermal zones (measurement points the mainboard firmware defines itself, usually near the CPU or across the chassis), both with the thresholds the firmware declares
健康情況 › 磁碟 I/OHealth › Disk I/O02 IOCTL_DISK_PERFORMANCE IOCTL_DISK_PERFORMANCE
健康情況 › 記憶體Health › Memory24 另加 Cached 與 SwapAdds cached memory and swap
System 圖表System graphs38 內建只有 Processes / Users / Uptime 三張,因為那些來自 HOST-RESOURCES。 Detailed Processor Usage、Context Switches、Interrupts、I/O、Swap I/O 這五張在 Linux 上來自 UCD-SNMP-MIB,Windows 內建服務沒有這個 MIB。jt-snmpd 以 NtQuerySystemInformation 補齊 The built-in service gives three (Processes, Users, Uptime) because those come from HOST-RESOURCES. Detailed Processor Usage, Context Switches, Interrupts, I/O and Swap I/O come from UCD-SNMP-MIB on Linux, and the built-in Windows service does not implement that MIB. jt-snmpd supplies them from NtQuerySystemInformation
健康情況 › 儲存Health › Storage22 筆數相同,差別在描述:jt-snmpd 以 GetVolumeInformationW 讀出真實磁碟區標籤與序號。中文標籤是實際會踩到的編碼問題,非 ASCII 一律以 UTF-8 編碼後送出,並已在 LibreNMS 端對端確認顯示正確 Same row count, different descriptions: jt-snmpd reads the real volume label and serial number with GetVolumeInformationW. Non-ASCII labels are a real encoding hazard, so they are encoded as UTF-8 on the way out and confirmed end to end through LibreNMS
連接埠Ports92 刻意較少:只輸出實體介面,不輸出 NDIS 篩選器驅動程式 Deliberately fewer: hardware interfaces only, no NDIS filter drivers
OID 總數Total OIDs7,582767 刻意較少:其中 3,999 個是預設關閉的資訊揭露。查過 LibreNMS 原始碼後 可以確定,已安裝軟體、執行中處理程序、連線表這三類在 LibreNMS 沒有任何取用端, 送出去也不會變成任何頁面;只有 ARP 有(ArpTable 模組),可用設定開啟。 逐項查證 Deliberately fewer: 3,999 of the gap is information disclosure that is off by default. Checked against LibreNMS's source, installed software, running processes and connection tables have no consumer in LibreNMS at all and would become no page if published; only ARP does (the ArpTable module), and it can be switched on. Item by item

感測器對照圖Sensors — side by side

內建服務完全不回報感測器,LibreNMS 因此根本不會建立「溫度」頁籤。 The built-in service reports no sensors, so LibreNMS never creates a Temperature tab.

SMART 對照圖SMART — side by side

內建服務沒有 SMART 應用程式,所以上半部是空的。SMART 完全透過 SNMP 送達; 沒量到的屬性保持 null 而不填 0,因為在「重新配置磁區」填 0 的意思是「這顆碟很健康」。 The built-in service has no SMART application, which is why the upper half is empty. SMART arrives entirely over SNMP; attributes that were not measured stay null rather than being reported as zero, because a zero in "reallocated sectors" reads as "this disk is healthy".

連接埠對照圖Ports — side by side

內建服務把每一個 NDIS 篩選器驅動程式都當成獨立介面;jt-snmpd 只輸出實體網路卡, 並以持久的 NET_LUID 配發 ifIndex,更新驅動不會讓歷史資料失去對應。 The built-in service publishes every NDIS filter driver as its own interface. jt-snmpd publishes hardware interfaces only, with ifIndex assigned from the persistent NET_LUID so a driver update does not orphan the history.

記憶體對照圖Memory — side by side

內建服務提供實體與虛擬記憶體;jt-snmpd 另外提供快取記憶體與 Swap。 The built-in service exposes physical and virtual memory. jt-snmpd adds cached memory and swap.

安裝Install

MSI 把需要的東西全部包在裡面,安裝時不上網抓任何東西。 不需要事先安裝 Windows 內建的 SNMP Service —— 填上 community 就能用。 機器上如果已經有內建服務在跑,安裝程式會沿用它的 community 與 sysContact / sysLocation,然後把它停用(停用,不移除),解除安裝時自動還原。 The MSI is fully self-contained — it downloads nothing during installation. The built-in Windows SNMP Service is not a prerequisite: supply a community and that is all it needs. If one is already running, the installer carries over its community and sysContact/sysLocation, then disables it (disabled, not removed) and restores it on uninstall.

下載最新版 MSIDownload the latest MSI 所有版本All releases 每個版本都附 .sha256,安裝前請先核對。 Every release ships a .sha256; verify it before installing.

本安裝檔未經 Authenticode 簽章,目前沒有申請憑證的計畫。點兩下安裝時 SmartScreen 會出現警告,UAC 提示的發行者會顯示為「不明」。完整性請改以 .sha256 驗證;WDAC / AppLocker 環境的處理方式(雜湊規則、自行簽章)見 程式碼簽章, 想從原始碼自行建置並用自己的憑證簽章見 自行編譯打包與簽章 This installer is not Authenticode signed, and no certificate is planned. SmartScreen warns on a double-click and the UAC prompt shows an unknown publisher. Verify the .sha256 instead; for WDAC and AppLocker environments see Code signing for the hash-rule route, and Building and signing it yourself to build from source and sign with your own certificate.

方式一:點兩下安裝(圖形介面) Option 1 — double-click (graphical)

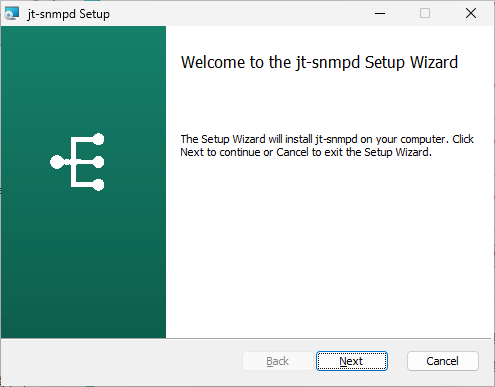
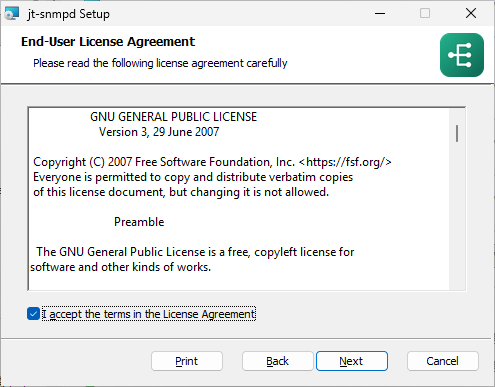
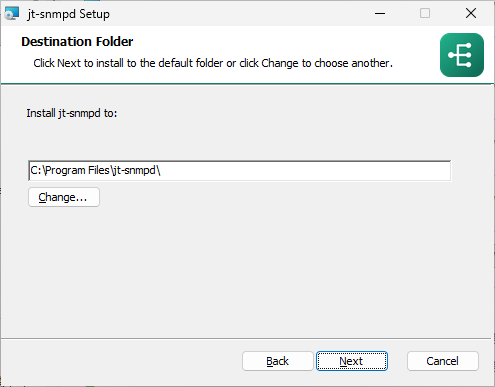
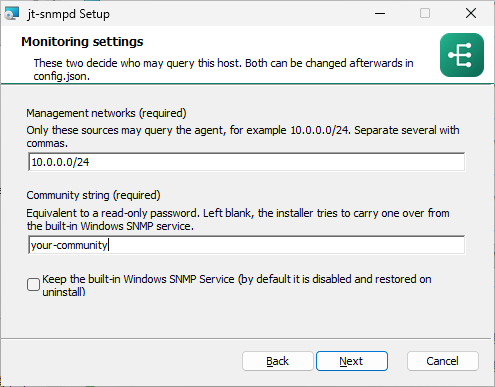
安裝程式會逐步詢問安裝路徑與監控設定。兩個必填的設定是管理網段community,它們決定誰查得到這台主機。事後也可以編輯 C:\ProgramData\jt-snmpd\config.json 再重新啟動服務。 The installer asks for the install location and the monitoring settings. The two required values are the management networks and the community string — together they decide who may query this host. Both can be changed afterwards by editing C:\ProgramData\jt-snmpd\config.json and restarting the service.

1. 歡迎頁1. Welcome
2. 授權條款(GPL-3.0)2. Licence (GPL-3.0)
3. 安裝路徑3. Install location
4. 監控設定,管理網段與 community 兩個必填 4. Monitoring settings — the two required values
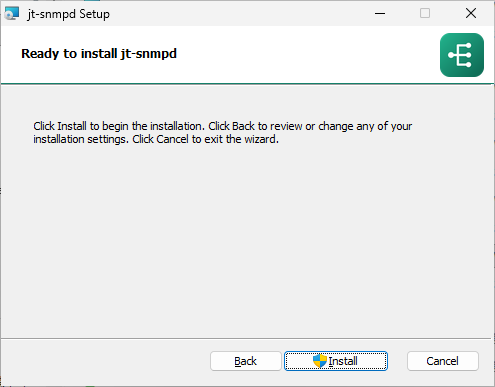
5. 確認後開始安裝5. Confirm and install
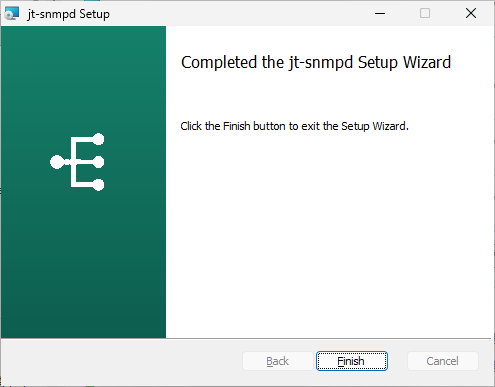
6. 完成6. Done

管理網段沒填就無法繼續,因為空清單等於只回應 loopback:裝好了,但沒有在監控。 畫面中的值是文件用範例(10.0.0.0/24your-community), 截圖取自實機上執行的發行版安裝檔,未經修改。 It will not continue without a management network, because an empty list means the agent answers only loopback: installed, but not monitoring. The values shown are documentation examples (10.0.0.0/24, your-community). The captures are of the released installer running on real hardware, unretouched.

方式二:命令列與 GPO 派送 Option 2 — command line and GPO deployment

下面這道指令是命令列 / 無人值守安裝用的,/qn 表示不顯示任何介面。 同一個 MSI 與同一組屬性也直接適用於群組原則(GPO)軟體派送:以 msiexec /qn 的形式派送,安裝過程以 SYSTEM 身分執行,不會有任何提示。 This is the command-line / unattended form; /qn means no interface at all. The same MSI and the same properties are what you use for Group Policy software deployment: deployed in this form the installation runs as SYSTEM with no prompts.

msiexec /i jt-snmpd-1.1.3-x64.msi /qn MANAGEMENTNETWORKS=10.0.0.0/24 COMMUNITY=your-community

以 GPO 派送時,請把 MSI 放在網域內的共用資料夾, 並確保電腦帳戶對該資料夾有讀取權限。從內部共用資料夾安裝也不會帶網頁標記(Mark of the Web), 因此不會遇到 SmartScreen。 For GPO, place the MSI on a domain file share and make sure computer accounts can read it. Installing from an internal share also avoids the Mark of the Web, so SmartScreen never appears.

萬一安裝或解除安裝走不完,手動移除 逐步列出安裝程式做過的每一件事,以及如何用手做完。 If an install or uninstall will not complete, Manual removal lists every step the installer performs and how to do each of them by hand.

裝完之後:啟用 SNMPv3 After installing — turning on SNMPv3

安裝程式不會問 SNMPv3,這是刻意的。MSI 屬性會被寫進 msiexec 的記錄檔,也會進 Windows 事件記錄的 1033 與 11707 —— 密碼一旦傳給安裝程式,就會以明文留在每一台被派送的機器上。 community 是唯讀的存取權杖,風險等級不同;v3 金鑰不是。 The installer never asks for SNMPv3, and that is deliberate. An MSI property is written to the msiexec log and to Windows Event IDs 1033 and 11707, so a passphrase passed to an installer ends up in plain text on every machine it is deployed to. A community string is a read-only access token and sits at a different risk level; a v3 key does not.

SNMPv2c 在安裝程式跑完就能用。SNMPv3 是第二個步驟,在被監控的主機上做: SNMPv2c works as soon as the installer finishes. SNMPv3 is a second step, on the monitored host:

cd "C:\Program Files\jt-snmpd"
.\jt-snmpd.exe user add librenms
sc stop jt-snmpd && sc start jt-snmpd

密碼是互動輸入的,而且只保存 localized key、不保存密碼。 這時候兩種都會回應,那正是切換期間該待的狀態:既有的監控還在運作,新的可以逐台驗證。 等到所有輪詢端都換過去,再在 config.json"v3_only": true 並重新啟動服務,就完全不接受 SNMPv2c。 要在很多台上做,同一道指令可以放進群組原則的啟動指令碼;密碼可以從標準輸入餵, 這樣不會出現在處理程序清單裡。完整說明見 SNMPv3事後調整設定 The passphrases are prompted for, and only the localized keys are stored, never the passphrases. Both versions now answer, which is where to sit during a migration: the existing monitoring keeps working while the new path is verified host by host. To refuse SNMPv2c once every poller has moved, set "v3_only": true in config.json and restart the service. Across many machines, run the same command from a Group Policy startup script; the passphrases can come from standard input, so nothing appears in the process list. Full details are in SNMPv3 and Changing settings after installation.

要在很多台上做,讓部署工具放一個檔案: C:\ProgramData\jt-snmpd\provision.json。代理服務在下次啟動時讀它、 把密碼轉成綁定該機器的金鑰以 DPAPI 保存,然後覆寫並刪除 —— 即使讀不成功也一樣刪,所以打錯字不會讓密碼留在磁碟上。 安裝程式仍然不接受任何 SNMPv3 參數:MSI 屬性會進 msiexec 記錄 與事件 1033 / 11707。怎麼把檔案送到機器上仍然是你要解決的,而且那是最弱的一段。 格式與取捨見 SNMPv3 Across many machines, have the deployment tool drop a file at C:\ProgramData\jt-snmpd\provision.json. The agent reads it at the next service start, turns the passphrases into keys localized to that machine under DPAPI, and then overwrites and deletes itincluding when it could not be parsed, so a typo does not leave passphrases on disk. The installer still accepts no SNMPv3 parameter: an MSI property is written to the msiexec log and to Event IDs 1033 and 11707. Getting the file to the machine is still yours to solve, and it is the weak part. The format and the trade-offs are in SNMPv3.

在 LibreNMS 啟用 SMART Enabling SMART in LibreNMS

SMART 的探索模組在 LibreNMS 預設是關閉的。沒有啟用時, jt-snmpd 照樣供應資料,但不會有人來取,裝置的「應用程式」分頁不會出現 SMART。 The discovery module that finds SMART is off by default in LibreNMS. Until it is enabled, jt-snmpd still serves the data but nothing collects it, and no SMART entry appears under Apps.

  1. 以管理員身分登入 LibreNMS,點右上角的齒輪圖示,選「全域設定」。 Sign in to LibreNMS as an administrator and open the gear icon in the top-right corner.
  2. 上方分頁選「探索」,展開「探索模組」。 Choose Settings, then Discovery in the sidebar, then Discovery Modules.
  3. 找到「應用程式」(即 applications),把它打開。 Find applications and switch it on.
  4. 回到該裝置頁面,按「重新探索裝置」(或等下一次排程探索)。 完成後裝置的「應用程式」分頁就會出現 SMART Go back to the device, open its gear menu and choose Rediscover (or wait for the next scheduled discovery). SMART then appears under Apps.

若偏好命令列,等效的指令是: If you prefer the command line, the equivalent is:

lnms config:set discovery_modules.applications true

輪詢端的 poller_modules.applications 預設就是開的, 所以探索過一次之後就會持續更新。 The polling side, poller_modules.applications, is on by default, so once discovery has run the data keeps updating.

全域打開之後,有一種裝置不會跟著生效。LibreNMS 的判定順序是 命令列的 -m、裝置層、OS 層、全域,先設到的先贏LibreNMS/Polling/ModuleStatus.php)。裝置頁齒輪選單裡的 Modules 開關只要動過就會留下一筆裝置層設定,關掉留下的那個「否」會一直壓過全域的「是」, 而且從全域設定頁上看不出來。整批 Windows 主機要一次打開, lnms config:set os.windows.discovery_modules.applications true 比全域更準:只影響 Windows 裝置,不會讓交換器與防火牆每輪探索多跑一次註定落空的 walk。 One kind of device will not follow a global switch. LibreNMS resolves the setting in the order command line, per device, per OS, global, and the first one that is set wins (LibreNMS/Polling/ModuleStatus.php). The Modules toggle in a device's gear menu writes a per-device setting the moment it is touched, so a device that was once switched off keeps a "no" that outranks the global "yes" — and nothing on the global settings page shows it. To enable a fleet of Windows hosts at once, lnms config:set os.windows.discovery_modules.applications true is the more precise option: it applies to Windows devices only, and spares every switch and firewall an extra discovery walk that was always going to come back empty.

文件Documentation

安全性評估Security assessment

實測放大倍率、權杖權限縮減,以及未緩解風險的誠實清單 Measured amplification factor, privilege stripping, and an honest list of what is not mitigated

與內建 SNMP 逐項對照Full comparison

包含 jt-snmpd 刻意回報「更少」的地方與原因 Including every place jt-snmpd deliberately reports less, and why

程式碼簽章Code signing

安裝檔未簽章:安裝時會看到什麼,以及 WDAC / AppLocker 環境怎麼處理 The installer is unsigned: what you will see at install time, and how to handle WDAC and AppLocker environments

部署到 Windows ServerDeploying to Windows Server

2016(含網域控制站)與 2022 都已實機驗證,以及各版之間該注意的地方 2016, a domain controller included, and 2022 both verified on real machines, and what differs between releases

自行編譯打包與簽章Building and signing it yourself

從原始碼自行建置 MSI、用自己的憑證簽章,WDAC 環境改用發行者規則而非雜湊規則 Build the MSI from source, sign it with your own certificate, and use publisher rules instead of hash rules under WDAC

手動移除Manual removal

安裝或解除安裝走不完時,安裝程式做過的每一件事該怎麼用手做完 When an install or uninstall will not complete: every step the installer performs, and how to do each by hand

資安檢測結果Scan results

當前基線:Bandit HIGH 0、相依零弱點,每一條發現都附判定,也列出還沒跑的項目 The current baseline: Bandit HIGH 0, no dependency vulnerabilities, a verdict on every finding, and an explicit list of what has not been run

資安檢測工具鏈Security scanning

Bandit / Semgrep / pip-audit / SBOM,以及可提交的報告格式 Bandit, Semgrep, pip-audit and SBOM, plus the report format a security review will accept

命名與路徑Naming and paths

磁碟上每個檔案的實際位置,以及從真實 bug 得出的編碼規則 Where every file actually lives, and the encoding rule that came out of a real failure

事後調整設定Changing settings afterwards

community、管理網段、限速與 v3 帳號怎麼改,以及改壞了會怎樣 Changing the community, networks, rate limits and v3 accounts, and what happens when one of them is wrong

SNMPv3SNMPv3

認證與加密輪詢,與 v2c 並存。預設 SHA-256 + AES-128, 只提供 authPriv,金鑰以 DPAPI 加密 Authenticated, encrypted polling alongside v2c. SHA-256 with AES-128 by default, authPriv only, keys encrypted with DPAPI

資安通報Security policy

怎麼私下通報弱點、範圍內外,以及那些常被通報但其實是已記載行為的項目 How to report a vulnerability privately, what is in scope, and the things that get reported but are documented behaviour

發版檢查清單Release checklist

個資 / 機密掃描、圖片人工審閱、不公開內容清單 Privacy scanning, image review, and what never gets published

測試計劃Test plan

L0–L7 分層、797 項自動測試、40 項實機生命週期檢查 L0–L7 levels, 797 automated tests, 40 on-hardware lifecycle assertions